Ember Resistant Vents Retrofit Guide Homebuilders for 2026
Wildfires are becoming an annual threat for Southern California homeowners, and your vents could be putting your home at risk. With wildfire seasons growing longer and more intense, even small embers can enter attic and crawl space vents, igniting hidden fires within minutes. The solution? An ember resistant vents retrofit provides the crucial protection your home needs to withstand these dangers.
Upgrading to ember resistant vents not only blocks embers but also gives you peace of mind during fire season. In this comprehensive guide, we will show you exactly how to retrofit your vents, step by step, so you can dramatically reduce wildfire risk in 2026.
You will learn what makes ember resistant vents effective, how wildfires threaten Los Angeles homes, and the best DIY and professional solutions available. Let’s get started on making your home safer and more resilient.
Understanding Ember Resistant Vents and Wildfire Threats
As wildfire defense experts serving Los Angeles, we see firsthand how ember resistant vents retrofit can transform the safety profile of a home. Many homeowners are surprised to learn that their attic and crawl space vents are often the weakest link when it comes to wildfire defense. Let’s break down why these upgrades matter and how you can protect your property.

What Are Ember Resistant Vents?
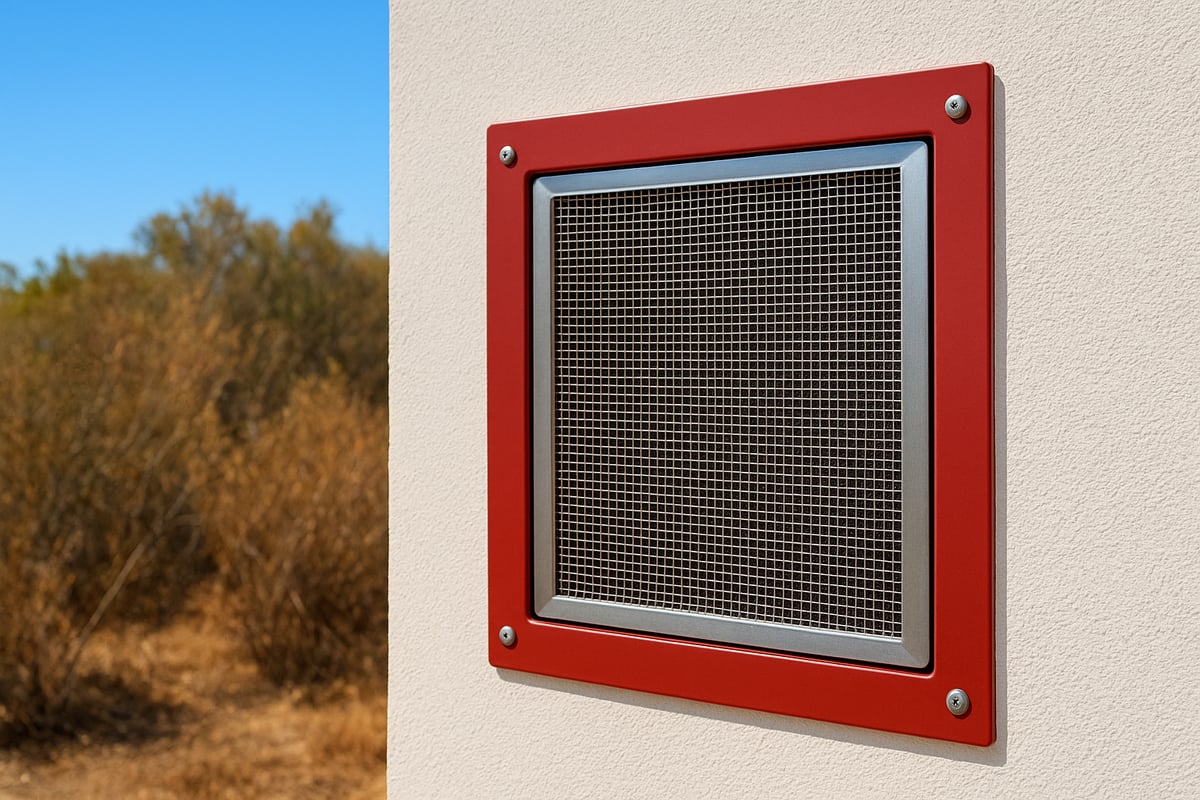
Ember resistant vents are specially engineered to block wildfire embers from penetrating your home's vulnerable spaces, such as attics and crawl spaces. Unlike standard vents, these systems use fine mesh (often 1/8 inch or less), heat-resistant metals, and innovative airflow designs. This combination keeps embers out while allowing necessary ventilation.
Typical features include:
- Stainless steel or aluminum mesh that withstands high temperatures
- Small mesh openings to block embers but maintain airflow
- Durable construction to resist warping or clogging
Traditional vents, by comparison, often have larger openings and less fire-resistant materials, making them susceptible to ember intrusion. For optimal protection, CAL FIRE recommends mesh sizes of 1/8 inch or less. To see the latest innovations and options, visit our Ember Resistant Vent Systems page for details.
The Growing Wildfire Risk in Southern California
Since 2017, the frequency and severity of wildfires in Southern California have increased dramatically. In Los Angeles alone, hundreds of homes are lost each year, with embers responsible for the majority of ignitions.
According to the National Fire Protection Association, over 80 percent of homes that burn in wildfires ignite from embers, not direct flames. Los Angeles homes face unique vulnerabilities due to hillside locations, dense vegetation, and the region’s prevailing winds. These factors make ember resistant vents retrofit an essential part of any wildfire defense strategy.
How Embers Enter and Destroy Homes
Embers can enter your home through multiple pathways, but vents remain one of the most common. During events like the Woolsey Fire, wind-driven ember showers overwhelmed standard vents, allowing hot particles to ignite attic insulation and structural wood.
Common entry points include:
- Roof and ridge vents
- Soffit and gable vents
- Eaves and under-deck spaces
When embers bypass old vents, they can smolder unnoticed until a full-blown fire erupts inside the home. Retrofitting with ember resistant vents retrofit is a critical step in breaking this chain of destruction.
Ember Resistant Vents vs. Other Home Hardening Measures
While defensible space and fire-resistant landscaping are vital, ember resistant vents retrofit directly addresses a key vulnerability most homeowners overlook. Vents are often the first line of defense against airborne embers.
Consider this comparison:
- Ember-resistant vents:
Protect against airborne embers, require low ongoing maintenance, and do not directly reduce flame spread. - Defensible space:
Protects against embers and helps reduce flame spread, with moderate ongoing maintenance. - Fire retardant application:
Helps reduce flame spread but does not protect against embers and requires high ongoing maintenance.
Combining vent retrofits with other strategies, like exterior fire retardant, creates a layered defense. However, without proper vent upgrades, even the best landscaping may be compromised.
As wildfire threats persist, taking action with ember resistant vents retrofit is one of the smartest, most effective steps you can take to protect your Los Angeles home. For a complete evaluation and next-level protection, reach out to our Matador Fire team for a free consultation.

Step-By-Step Guide: Retrofitting Your Home with Ember Resistant Vents
Protecting your Los Angeles home from wildfire embers starts with an effective ember resistant vents retrofit. As wildfire defense experts at Matador Fire, we guide homeowners through each retrofit phase, ensuring your property stands strong against ember intrusion.

Step 1: Assess Your Current Vents
Begin your ember resistant vents retrofit by identifying all exterior vent types. Walk around your home and note soffit, gable, foundation, and ridge vents. Older homes, especially those built before 2008, often have large mesh or plastic vents that allow embers to enter.
Use this quick checklist to spot vulnerabilities:
- Mesh size: Openings larger than 1/8 inch
- Material: Plastic or corroded metal
- Gaps or cracks: Spaces around the vent frame
- Debris blockages: Leaves, nests, or cobwebs
If you find any of these issues, your home is at risk. Early detection is the first step toward a successful ember resistant vents retrofit.
Step 2: Select the Right Ember Resistant Vents
Choosing the correct vents is crucial for a reliable ember resistant vents retrofit. Look for vents that meet California Building Code and ASTM E2886/E2912 standards. Three common types include:
- Mesh vents (1/8 inch stainless steel)
- Baffle vents (angled, block embers but allow airflow)
- Intumescent vents (expand and seal in extreme heat)
Material matters. Stainless steel offers the best durability, while aluminum is lightweight and resistant to rust. Decide if a retrofit kit (fits over existing vents) or a full replacement is best for your situation. Review manufacturer specifications to ensure proper fit.
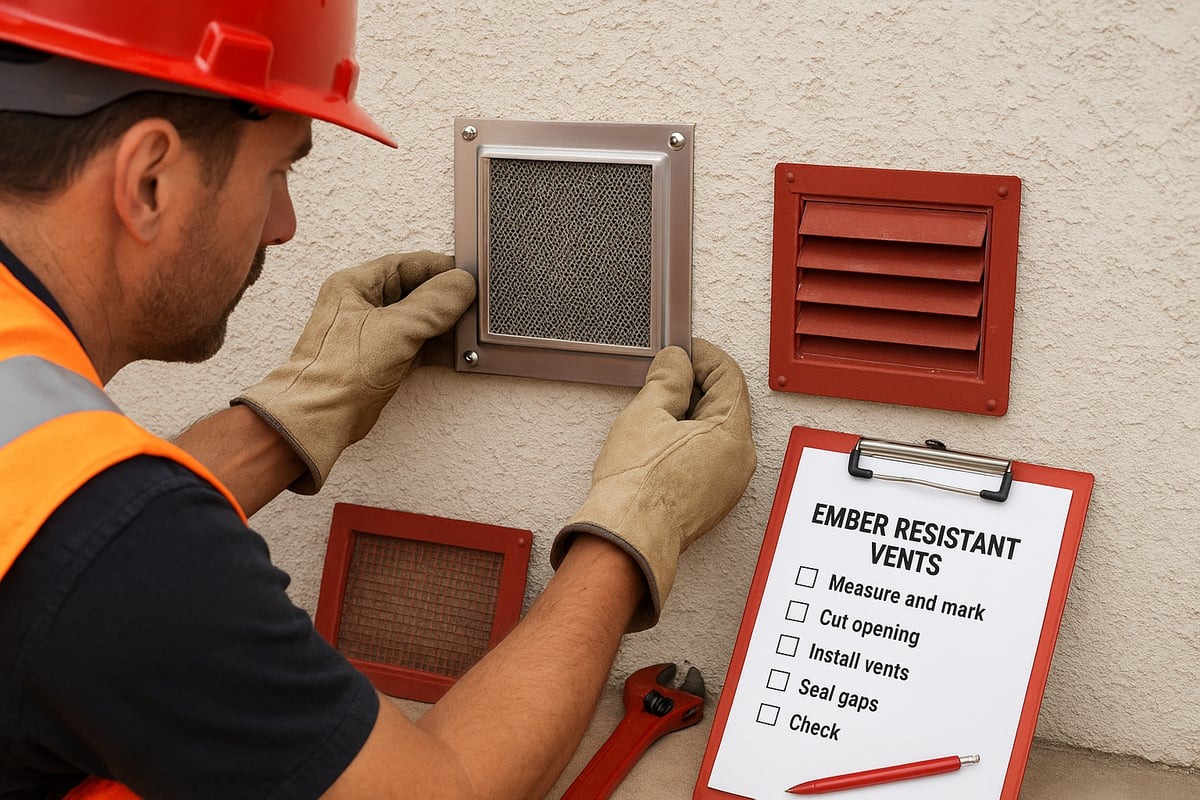
Step 3: Prepare Your Home for Retrofit
Safety is paramount during any ember resistant vents retrofit. Before starting, gather personal protective equipment (PPE): gloves, safety goggles, and a dust mask. Use sturdy ladders and power tools carefully.
Remove old vents by unscrewing or prying loose covers. Clean the vent opening, clearing away debris and checking for hidden cracks or gaps in the siding. Repair any damage before installing new vents to ensure a secure, ember-proof seal.
Step 4: Install Ember Resistant Vents
Now it is time for the hands-on part of your ember resistant vents retrofit. Follow these steps for most vent types:
- Position the new ember resistant vent over the opening.
- Secure with corrosion-resistant screws.
- Seal all edges with fire-rated caulk for a tight fit.
- Double-check that the vent sits flush, with no gaps.
For ridge and soffit vents, installation may require a second person for safety. Always follow manufacturer instructions for best results.
The right tools include a drill, screwdriver, and caulking gun. For a typical single-story home, expect this process to take 1–2 days.
Want a visual guide? Watch this Home Hardening in Action: Ember Resistant Vent Installation video for step-by-step tips from industry professionals.
Step 5: Inspect and Test Your Work
After installation, inspect each vent to confirm proper fit and airflow. Hold a smoke source or use air pressure to ensure vents function as intended without leaks. Check that all work complies with local building codes.
Schedule periodic inspections, especially before fire season. Document your retrofit with photos for insurance or code compliance records.
Maintaining Your Ember Resistant Vents
Regular maintenance extends the life of your ember resistant vents retrofit. Clean vents twice a year and after wind events. Look for signs of rust, warping, or animal nests. If you spot any damage, contact a professional for repairs.
DIY Wildfire Defense: Additional Steps Homeowners Can Take
Homeowners in Southern California face increasing wildfire threats each year. One of the most effective steps you can take is an ember resistant vents retrofit, which dramatically reduces the chance of embers entering your home. While this upgrade is crucial, additional do-it-yourself actions can further safeguard your property. As wildfire defense experts at Matador Fire, we recommend these proven steps to complement your ember resistant vents retrofit and create a stronger defense for your home.

Clear Gutters and Roofs
Regularly clearing gutters and roofs is a foundational part of any ember resistant vents retrofit strategy. Embers can easily ignite dry leaves, pine needles, and debris that collect in these areas.
- Remove organic material from gutters, valleys, and roof surfaces.
- Use gloves, a sturdy ladder, and a gutter scoop or blower for safety.
- Schedule cleanings before peak fire season and after windstorms.
Clogged gutters can act as tinder, allowing embers to start a fire right along your roofline. Even with an ember resistant vents retrofit, neglecting this step leaves your home exposed. For official recommendations, see CAL FIRE Home Hardening Guidelines.
Trim Trees and Maintain Defensible Space
Trimming trees and maintaining defensible space is essential for maximizing the effectiveness of your ember resistant vents retrofit. Dense vegetation or overhanging branches increase the risk of embers reaching your home.
- Prune branches at least 10 feet from roofs and chimneys.
- Maintain a 5-foot non-combustible zone around the perimeter.
- Remove dead plants, weeds, and overgrown brush regularly.
Homes with well-maintained defensible space are significantly more likely to survive wildfires. Follow local Los Angeles County ordinances and stay proactive to support your ember resistant vents retrofit.
Move Woodpiles and Remove Flammable Debris
Another key step in home hardening is moving woodpiles and removing flammable debris. Even with an ember resistant vents retrofit, combustible materials close to your home can ignite and threaten your structure.
- Store firewood and lumber at least 30 feet away from all buildings.
- Remove dead vegetation, cardboard boxes, and yard waste from around your house.
- Dispose of debris responsibly, especially before red flag warnings.
By keeping your property clear, you reduce the number of ignition sources and enhance the protection offered by your ember resistant vents retrofit.
Maintain and Monitor All Exterior Vents
Ongoing maintenance is vital after an ember resistant vents retrofit. Regular inspections keep vents clear and functioning as intended.
- Check for animal nests, cobwebs, or blockages each season.
- Use a flashlight to inspect vent screens and ensure no gaps are present.
- Address any damage or wear promptly to maintain optimal performance.
A consistent maintenance routine ensures your ember resistant vents retrofit continues to protect your home during every wildfire season. For comprehensive protection, consider professional solutions from Matador Fire, including custom vent installation, fire retardant application, and on-demand defense systems. While these DIY steps are critical, a full home-hardening plan is best managed by experts. Contact Matador Fire today for a free consultation and peace of mind.